
Dia-what?
As a prenatal and postnatal exercise specialist, one of my most frequent questions I get asked is “When will my diastasis go away”. It’s always a tough position to be in because every woman heals differently and at their own rate.
Studies show that 100% of women get diastasis recti after the 35th week of pregnancy. So it’s pretty much unavoidable. Within the first 8 weeks postpartum the tissues can repair spontaneously without much intervention. Those are the lucky ones! For most however, they’ll need to work a little harder.
Diastasis recti or DRA as its often referred as is a stretching of the inter-recti distance – meaning the distance between the two sides of the rectus abdominus muscle - commonly known as the “6-pack muscle”.
Are you functional?
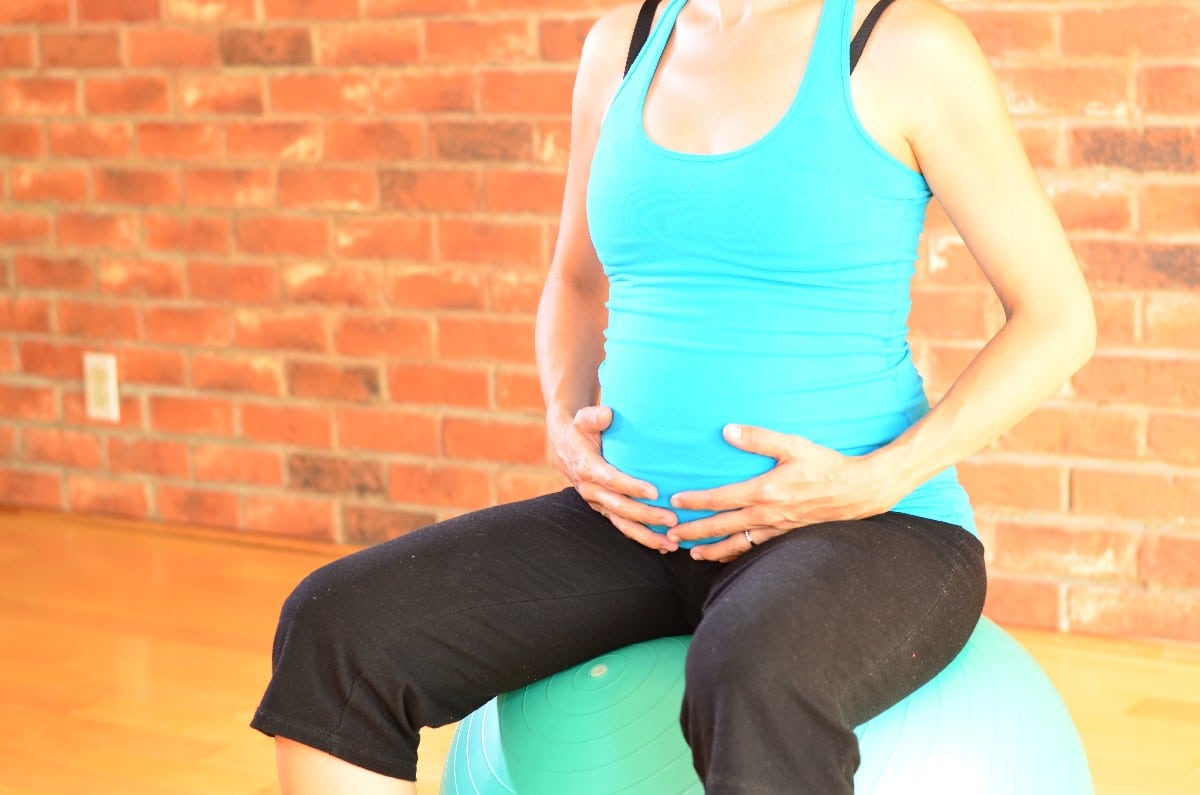
The distance between the two sides of the rectus abdominis is often measured with fingers. For example: 2 finger-width DRA or 5 finger-width etc. I often evaluate the inter-recti distance because a lot of my clients are interested and because some of the prescribed exercises will be different if it’s present. There seems to be this underlying competition amongst women of “how many fingers wide is your DRA?”. However, when I measure the distance, I’m less concerned with how many fingers I can get in there and more concerned with the client’s ability to create tension.
Someone with 2 fingers width can be less functional than someone with 4 fingers width. How? Well if my 4 finger-width client can generate some tension and there is a change in the tissue quality and my 2 finger-width client has no change then my 4-finger width client is heading in the right direction compared to the 2-finger-width client.
I check the tension while the client lifts their head slightly off the floor. Then I ask them to do a kegel and I check again (I also use other ways to evaluate during various dynamic exercises). If there is a difference between the two then I know that it’s leaning more towards a functional DRA. My concern is more when I don’t feel a difference as I ask my client to do a kegel and lift their head off floor. The non-functional DRA can possibly lead to more complications such as lower back pain, incontinence, hip/pelvic pain and hernias.
Some women will live their entire lives with DRA yet be very functional and strong.
How to check if you have DRA
Lie on your back with your knees bent.
Slightly lift your head off the floor
Check for doming (where it may look like a little dinosaur back is popping out from your belly) or a valley. If you can’t see the valley, put a few fingers just above your belly button and then below it. Do your fingers fall in between a valley-type structure? If you contract your pelvic floor and abs and then lift your head off the floor, does it change?
If it changes, then you’re on the right path! There is some function within your linea alba and your abdominal wall. Of course it gets more complex than just this, the human body is very complex, but for simplicity sake, let’s say you’re off to a good start!
But I want a flatter tummy!
So by now if you’ve felt some change in the tissue quality, it means you’re functional and happy right? Well, not necessarily…because being functional doesn’t necessarily always fix the ‘mummy tummy’ look right?
If what we’re looking for is mostly being functional, such as not peeing our pants or hurting ourselves, then why are we still obsessed with DRA? Well, as superficial as it may sound to some of you, it really comes down to esthetics. I see the stress and worry on my client’s faces when 2 months postpartum they still have a little pooch in the belly. Their brains are fast-forwarding 5, 10, 15 years down the road and they’re imagining themselves never losing the baby fat – or perhaps looking *gulp* like their mother who never looked the same after having babies!
Go gently
I’m not sure if what I say truly helps them believe that it will go away or that they won’t become their mother, but I still use the same speech over and over: Take it slowly, give it time.
I mean I get it, I too don’t want to be asked 2 years postpartum “when is your baby due?”. FYI – you’re allowed to want a flatter belly, you’re allowed to want the body you want. Don’t feel guilty about this.
It will change. Perhaps you won’t ever find your pre-baby body, but that doesn’t mean you can’t find a stronger healthier you. That doesn’t mean that you can’t learn to love your new body. And if you’re not happy with your new look, then yes, you’ll have to work a little harder, you’ll have to change some habits and yes, you’ll have to do this regularly. You will have to get out of your comfort zone and work hard to create change. You can do it!
Does this mean doing 100 sit-ups and burpees everyday? Absolutely not! It means that at first it may be repetitive, simple exercises to help reconnect and strengthen your inner core (check out exercises below) and then eventually, it can be 6 months, 1 year or 2 years down the road, you will start to intensify your trainings. (Be mindful of the level of intensity of your workouts if you are breastfeeding)
Give your body time to readjust, give it time to rebuild itself in an intelligent way. You have a long time to work on yourself, you will get stronger, you will get leaner. Your body changed drastically over 9 months of nesting that little babe, it needs for most at least 9 months to regain its pre-baby strength (yes there are always exceptions to this rule, some bounce back really quickly others more slowly. Never compare).
Other suggestions to help DRA
- Eating lots of protein, healthy fats, whole grains, vegetables and fruit is very important.
- Supplements such as collagen, vitamin C and probiotics are good to add to your healthy diet (always check labels and talk to your doctor/naturopath before taking medication, especially if pregnant and breastfeeding).
- Belly binding (Belly wrap) and Kinesio Taping are also other interesting ways to recover. In a randomized controlled trial, patients that had major abdominal surgery found that the binding provided a non-invasive way to enhancing recovery of walk performance, controlling pain and distress and improving patients’ experience following abdominal surgery (Chiefetz et al 2010).
- Breathe, breathe, breathe
- Seeing a pelvic floor physiotherapist is always one of my top suggestions as you already know!
Here are a few exercises to do in the first 6 months of recovery
Nobody said it would be easy, they said it would be worth it
BREATHE BREATHE BREATHE (and contract your pelvic floor on the exhale!) 🙂
- Bridge
Lie on your back, knees bent. Inhale. Exhale, lift your pelvis, forming an even line from the knees to your pelvis to your rib cage. Contract your pelvic floor before lifting. Lift and lower 10x, 2-3 sets.
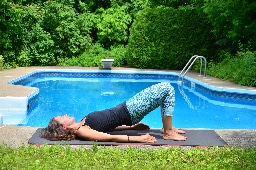
Focus: Do not increase arch in your back, do not thrust ribs up. You can place a ball or cushion between knees to intensify.
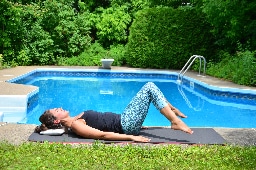
2. Toe taps
Lie on your back, legs bent in the air. Inhale
Exhale, contract abdominals and carefully lower one foot down towards the floor. Inhale lift back up to start
Focus: keep pelvis stable, if you feel pressure down in your pelvic floor or pain in your back bring your legs closer to chest or keep one foot down on the ground with knee bent
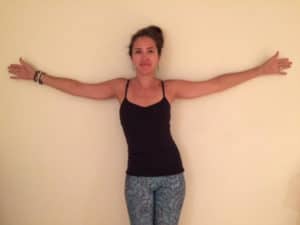
3. Rib slide
Stand against the wall with your arms in a T position, your entire upper back (bra strap area and lower ribs) and shoulder blades against the wall.
Move your ribs to the right and left without ungluing your shoulder blades/back off the wall (lower back may be slightly off the wall. Keep pelvis still. Think of the “Walk Like an Egyptian” song and move your torso like that!
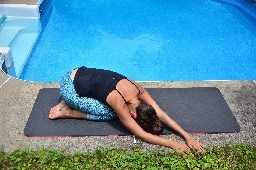
4. Side bend/obliques stretch
Kneel in child’s pose with your arms reaching out front
Reach your arms over to the right, pulling your left pinky finger further away from the head, adding more pressure down on your left sit-bone. Breathe and let go
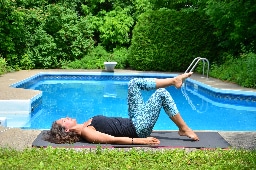
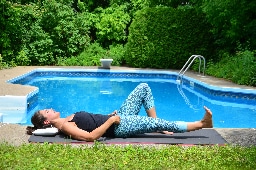
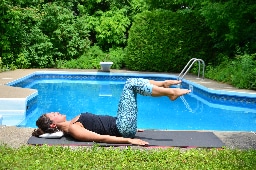
5. Leg slide
Lie on your back with both knees bent and feet on mat.
Exhale contract your pelvic floor and abdominals and extend one leg forward, hovering it 1-2 inches off the floor (my hands are on my pelvis to show levelness and help anchor it down, which you can also do!). Inhale bring it back in, keeping the heel hovering 1-2 inches. 10x
PROGRESSION/More advanced exercises (approx. beyond 9 months)
- Log roll
Lie on your back with your legs straight (they can be crossed to make it easier or not for harder) and your arms above your head.
Roll over like a log onto your stomach, then back onto your back. Do this back and forth 10x
Focus: do not lift your head off the ground or swing your leg or arms over and across to do this, make it happen from your center (you can cheat a little by crossing your legs at start)
2. Double leg toe taps with legs in internal rotation
Lie on your back with both knees bent in the air, knees touching feet apart (thighs will be in internal rotation, sort of in the snow plow position)
Inhale prepare. Exhale carefully lower both legs down towards the ground. Inhale return to start. 5-10x
Focus: only go as low as your pelvis remains stable, if you feel pressure on your pelvic floor go back to single leg, lower less far or bring knees closer to your chest. You can also squeeze a thin book between knees.
3. Side plank
Side-lying, supported on your forearm.
Exhale contract pelvic floor and abs and lift pelvis off the floor. Inhale lower. 10x
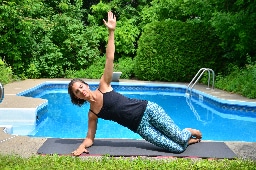
Focus: lower/engage your shoulder blade/shoulder before lifting pelvis. For a more intense experience, add pulses or do it with your legs stretched long (legs staggered or feet stacked together)
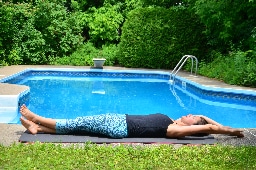
4. Angels
Lie on your back with your arms long by sides towards feet, legs straight (or bent)
Reach arms out to sides and overhead without lifting ribs off the mat (can place pillow under head). 5-10 times
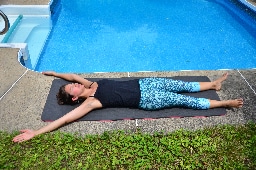
Focus: Don’t unglue your back from the floor. Only go as far as your shoulders allow. If you feel pain, stop, breathe, and return to start.
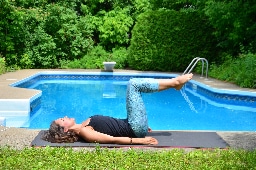
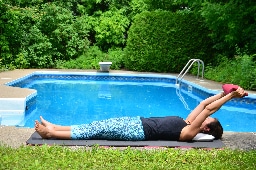
5. Arm raises with weight
Lie on your back with your legs straight or bent (you can raise your upper body on a bolster or a few pillows). Hold weight above chest (I’ve got a yoga sandbag, you can use regular weights, a weighted ball or even a log!)
Inhale reach arms overhead without thrusting ribs off mat. Exhale return (you can also reverse the breath, do what feels most natural to you)
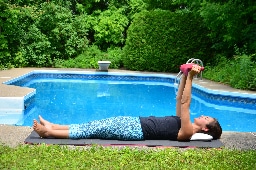
Modification propped up higher:
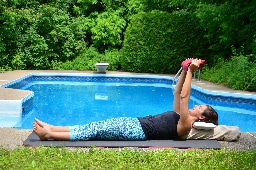
Focus: Don’t unglue your back from floor. Slide your rib down towards pelvis in the opposite direction of your arms as they reach back. Only go as far back as your shoulders allow.
Final Tips:
Go gently, NEVER COMPARE WITH FRIENDS (or Instagram!), take your time, YOU MATTER, breathe deeply.
Brigitte xo